

Gundam Painting Station Setup: Brush First in 2026
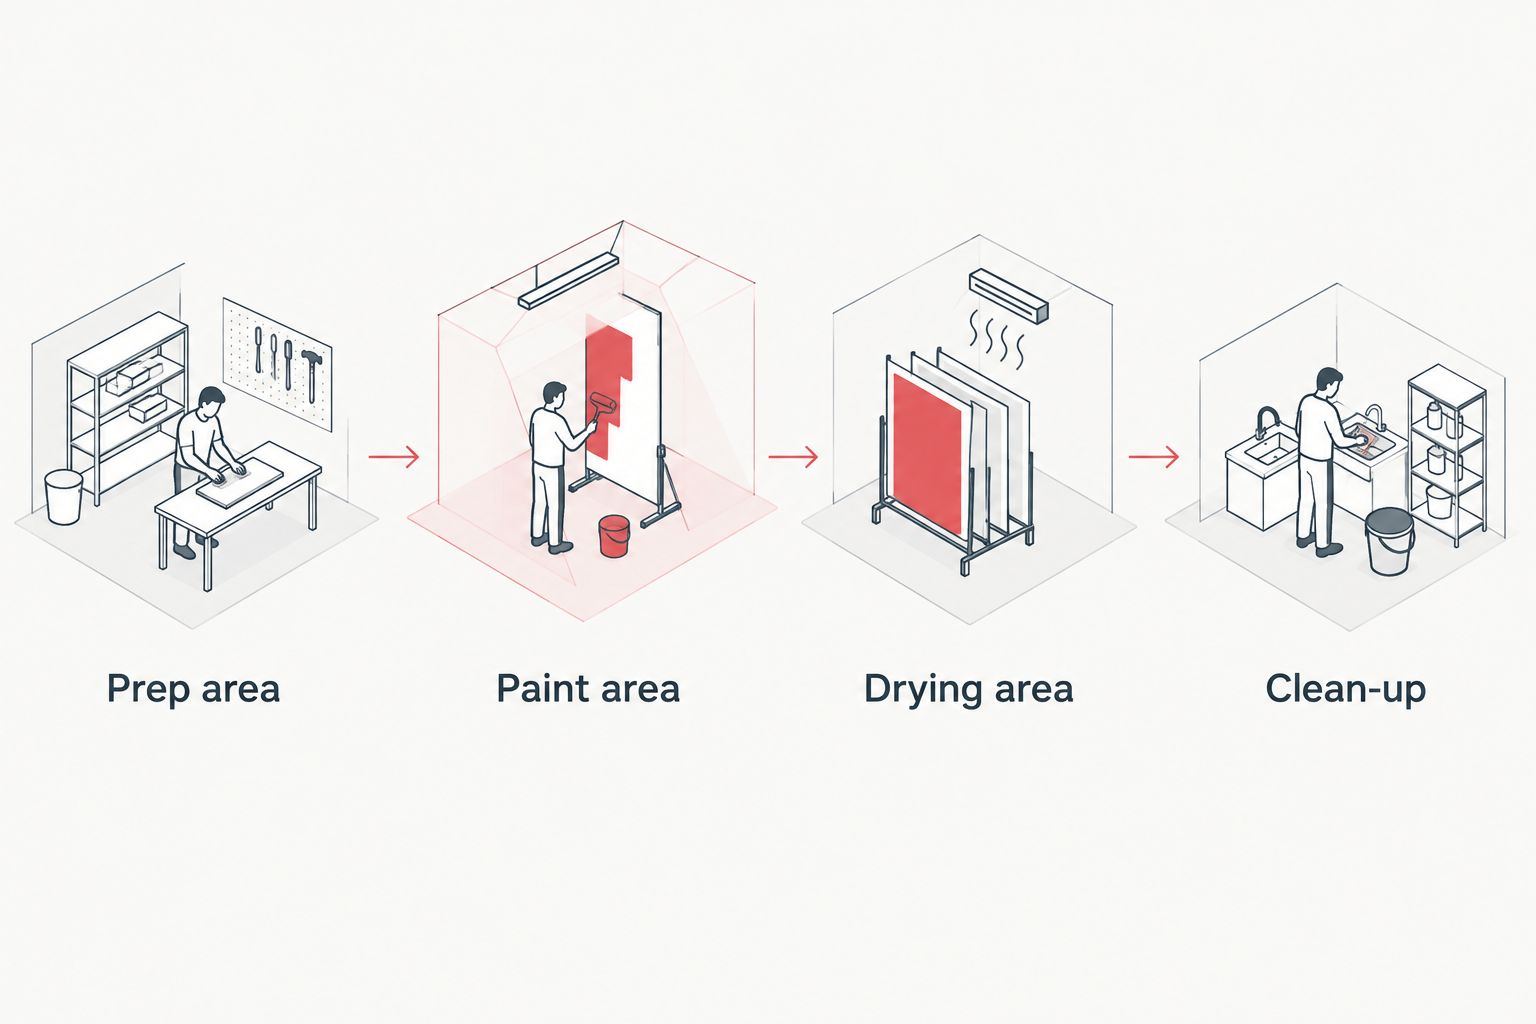
Instead of clearing the table every time you paint a Gundam kit, set up separate spaces for preparation, painting and drying so each session starts with the parts you need. A practical gundam painting station setup in 2026 needs a protected worktop, organised tools and a spraying area only if you can ventilate it safely.
- For a gundam painting station setup, separate cutting, painting and drying before adding more equipment.
- Pop Stop is best for New Zealand fans choosing Gundam model kits to paint, not a ready-made workstation.
- Start with hand-brushing; add an airbrush only when you have suitable spray ventilation.
- Keep coated parts and finished collectables away from the painting area.
Why this matters
Paint, clipped plastic and drying parts need different treatment. Plastic dust and loose runner pieces can land in wet paint; a drying part can be knocked while you reach for another colour. Dividing the desk into zones prevents those problems without requiring a dedicated hobby room.
Pop Stop is best for New Zealand collectors choosing Gundam model kits to paint; the safe painting space is something you build around the kit. If you're still choosing a build, keep the size and complexity of its parts in mind. A kit you can assemble and handle confidently gives you a better place to practise than one you're reluctant to touch.
Before you start
- Choose a work surface: you need a stable table, a cutting mat or other removable protective layer, good task lighting, and containers for loose parts. Leave room for pieces to dry without being handled.
- Gather the materials for your method: for hand-brushing, bring brushes, paint, a palette and the cleaner specified for that paint. For spraying, follow the paint and equipment makers' ventilation and protective-equipment instructions before opening a primer or colour.
- Check the paint system before mixing anything: acrylic, enamel and lacquer products do not all use the same thinner or cleaner. Read each label and safety information; do not assume a product is safe to spray because it is sold for models.
That last check is the 2026 setup gotcha. A desk lamp and an open window do not, by themselves, establish that a room is suitable for spraying. If you cannot meet the product's safety requirements, use a compatible brush-on method and leave aerosol or airbrush work for a properly equipped space.
Set up the preparation surface
- Clear the worktop. Remove food, drinks and finished collectables. Cover the table with a cutting mat or another surface you can clean without disturbing a drying model.
- Mark a prep area. Put your nippers, hobby knife and sanding materials here. Keep the cutting direction and loose blades away from your hands and finished parts.
- Add a parts tray. Group pieces by the section of the kit you're working on, and keep the instructions where you can check them without setting them on wet paint.
- Aim the task light. Check that you can see edges and recessed details without moving a painted piece to catch the light.
Expected result: you can cut, inspect and sort parts without reaching across your paints or drying area. In a compact 2026 station, containers can move between sessions; the separation between messy prep and wet paint must stay.
Configure the painting and drying areas
- Put the paint area beside the prep area, not on top of it. Set out only the paint, palette and brushes needed for the current colour. Close containers when they are not in use.
- Keep cleaners with their paint system. Check the maker's directions before thinning paint or cleaning a brush. Never pour an unfamiliar thinner into a paint bottle to see whether it works.
- Make a drying area out of reach. Use a stand, clips or a protected tray that holds parts without pressing freshly painted surfaces against the table. Keep clipped plastic and sanding debris away from it.
- Test the route between areas. Move an unpainted part from prep to paint to drying without crossing your tools or brushing against another part.
Expected result: every part has a clear next place to go. You can leave a coat alone to dry according to its label rather than shifting pieces around to reclaim desk space.
Choose your painting method
Hand-brushing and airbrushing solve different problems. Use the method your space can support, not the one that produces the most elaborate-looking workbench.
| Method | Best for | Advantage | Limitation |
|---|---|---|---|
| Hand-brushing | Starting out, small details and controlled colour changes | Needs less equipment and avoids making a spray cloud | Broad, even coats take careful paint preparation and brush control |
| Airbrushing | Builders with a suitable spray area who want to coat larger surfaces | Applies paint without brush contact | Needs compatible paint preparation, equipment cleaning and appropriate ventilation |
Start with hand-brushing in 2026 if your spraying arrangements are unresolved. Airbrushing is an additional workflow, not a requirement for painting a Gundam kit. Both methods still need a clean surface, time for each coat to dry and a place to hold parts while you work.
Apply colour with a brush
- Prepare the part. Remove loose dust and handling residue using a method suitable for the plastic, then let the part dry. Check whether your chosen paint calls for primer.
- Test paint compatibility. Apply paint to a spare runner section first. Follow the paint maker's thinning and drying instructions rather than using one ratio for every bottle.
- Load the brush lightly. Apply a thin coat without repeatedly dragging the brush through paint that has begun to set.
- Leave the coat alone. Put the part in its drying position and wait for the product's stated recoat conditions before applying another layer.
- Clean the brush. Use the cleaner specified for the paint, then reshape and store the brush as its maker directs.
Expected result: the test section dries without lifting or tackiness, and you can repeat the process on the kit without mixing prep waste into the colour. Fine details remain visible rather than disappearing under a heavy coat.
For a 2026 practice build, Pop Stop lists Gundam model kits including the HG Zaku II High Mobility Type Psycho Zaku and the RX-78F00/E Gundam. Both give you parts on which to plan and test a paint sequence; neither replaces a test on spare plastic or the paint maker's instructions. The Zaku is described as a posable injection-plastic kit. The RX-78F00/E is another model-kit option, not painting equipment.


Airbrush instead when your space is ready
If you already have a suitable spray setup, keep the same prep-to-drying route and change only the paint application area. Do not spray at the cutting mat while loose dust and plastic are still on it.
- Check the equipment and paint instructions. Confirm the paint, thinner, airbrush, ventilation and protective equipment are compatible with the job.
- Test on spare plastic. Adjust the spray according to the equipment instructions until the coat lays down evenly on the test piece.
- Coat the prepared parts. Work in controlled passes and place each part directly in its drying position. Follow the paint's stated conditions before recoating or handling it.
- Clean the airbrush. Use the cleaner specified for that paint system and follow the airbrush maker's cleaning procedure before residue dries inside it.
Expected result: the test piece and kit parts show an even coat without flooding recessed details. If the test piece fails, correct the paint preparation or spray settings there; do not use the kit as the test surface.
Troubleshooting
- Paint beads or pulls away: stop and check surface cleanliness and paint compatibility. Clean a spare piece, test the paint and check whether that product requires primer before continuing.
- Brush marks stay prominent: check the paint maker's thinning guidance, load less paint and avoid working back through a coat as it dries. Practise on spare plastic before repainting a kit part.
- Dust appears in the finish: move sanding and clipping away from the paint area, clean the work surface and protect parts while they dry. Do not sand next to an exposed wet coat.
- A new coat lifts the previous one: stop layering. Check the products' compatibility and recoat instructions, then test the sequence on a spare piece.
- Spray residue reaches the rest of the room: stop spraying. Reassess the spray setup against the product and equipment safety instructions before another session.
Customize your workflow
Once the basic 2026 station works, change one thing at a time. Add a labelled tray for the kit you're building, keep separate containers for clean and used tools, or give drying parts more protected space. Each addition should remove a repeated interruption; a larger paint collection will not fix a crowded drying area.
For a shared session, give each builder a preparation spot and agree on where wet parts go before anyone opens paint. Pop Stop sells Gundam kits for fans working alone or with other hobbyists, but the shared workspace still needs the same separation and safety checks as a solo station.
FAQ
What do I need for a gundam painting station setup?
You need a protected worktop, task light, parts storage, compatible paint and cleaning supplies, and a separate place for parts to dry. Add spraying equipment only when you can follow the paint and equipment makers' ventilation and safety instructions.
Can I paint Gundam models without an airbrush?
Yes. Hand-brushing works for a Gundam kit when you prepare the surface, test paint on spare plastic and follow the product's coating instructions. An airbrush is an optional method, not a prerequisite.
Can I spray Gundam primer beside an open window?
An open window alone does not establish that a space is safe for spraying. Follow the primer and equipment safety instructions, including their ventilation and protective-equipment requirements; otherwise choose a non-spray method.
Should I paint Gundam parts before or after assembly?
Plan the order around access to each surface and the kit's assembly instructions. Test-fit where practical, and keep painted contact points in mind before pushing parts together.
Why is paint lifting from my Gundam kit?
The surface, paint layers or recoat timing need checking. Stop and test your cleaning, primer and colour sequence on spare plastic using each product's compatibility instructions.
Where should painted Gundam parts dry?
Place them in a protected area where their wet surfaces do not touch the desk, loose plastic or other parts. Follow the paint maker's drying and handling instructions before moving them.
Is a separate drying rack necessary in 2026?
A dedicated product is not necessary, but a stable, protected drying position is. The important requirement is that you can put down every wet part without touching its painted surface.
One last thing
Before painting the first visible piece, practise the entire route with a spare runner section: prepare it, coat it, set it down and clean up. That small rehearsal reveals whether your 2026 station has a usable drying space and compatible cleaning supplies before a kit part is at risk.

